


Food
Feature


Defining the Israeli Kitchen
Yom Huledet Sameach, Israel! Happy birthday to my beloved, beautiful—and currently very troubled—homeland. In spite of the divisiveness in the national state of affairs as we approach Israel’s 75th birthday, Independence Day remains an occasion to celebrate.
And I’m not one to lose my appetite during stressful times, much less joyous ones, so at this important milestone, my thoughts have turned to food. Specifically, with this question in mind: What single dish most aptly represents the cuisine of my adopted country?

Israeli food culture remains a bright spot on the world stage. Israel’s melting-pot cuisine continues its well-deserved ambassadorship, showcasing a nation whose multiculturalism is at the core of its identity—an identity that continues to evolve with every passing year.
To help determine the country’s flagship dish, I reached out to Israeli chef friends and colleagues to weigh in with their choices—and some of them answered with a mouthful of carbohydrates.
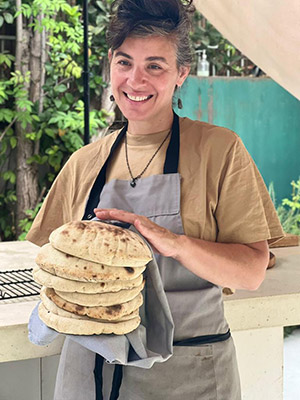
“I’d say anything in a pita,” said Naama Shefi, the founder of New York-based Jewish Food Society as well as Asif Culinary Institute of Israel, located in Tel Aviv. “Pita is not just a pocket bread but a way of life. We put all sorts of things inside, from chicken livers, falafel and shawarma to fried eggplant, steak and even cauliflower. It makes for a perfect portable lunch.”
Shefi favors stuffing her pitas (the plural in Hebrew is “pitot”) with schnitzel—pounded chicken cutlets that have been breaded and pan-fried. That’s a pairing that Israeli-born, New York-based spice entrepreneur Lior Lev Sercarz of La Boîte spice shop endorses for its unique Israeliness.
“Pita symbolizes the beautiful crossroads of all the cultures intersecting in Israel, encased in a round of bread,” said Sercarz, author of The Middle Eastern Pantry, a cookbook scheduled for release in June, and co-founder and chief culinary officer of the new Galilee Culinary Institute located at Kibbutz Gonen. “The Ashkenazi roots of the schnitzel, the Middle Eastern roots of the pita—when put together, it’s almost the Israeli equivalent of a burger.”
James Beard award-winning chef Michael Solomonov, co-owner of Zahav, a restaurant in Philadelphia, along with many other eateries there as well as in New York City, believes it’s the condiments—Yemenite schug (hot sauce), Iraqi amba (mango sauce), Moroccan harissa, among others—that make the dish.
“They are the United Nations of flavors, and you can mix them however you like,” he told me.
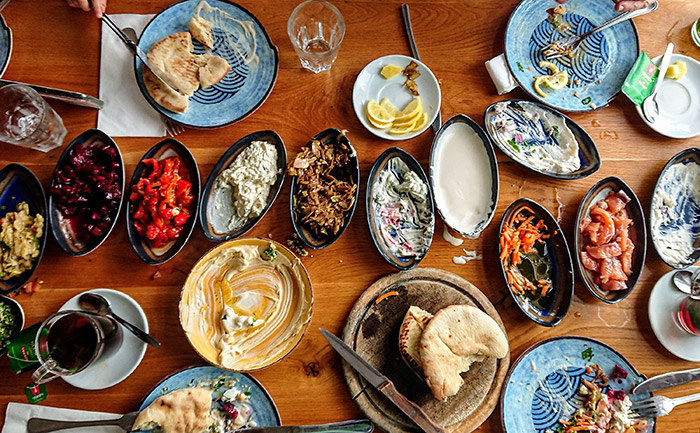
In a land known for its farm-fresh, market-driven cuisine, vegetables also loom large.
“For me, the pinnacle of the Israeli plate is a chopped vegetable salad seasoned with fresh lemon juice and grassy, spicy olive oil made from local green suri olives,” said Merav Sarig, an Israeli food editor and partner in HaShizra, an initiative to promote women in the food and wine industries. “In Israel, we have a bounty of fresh vegetables year-round, and the warm climate typical of this region creates a constant craving for them. A green salad is a non-negotiable element of every meal in Israel, and not just dinner—breakfast, too. It’s a taste of childhood that endures through adulthood.”
In Israel, diners will often encounter a chopped vegetable salad served alongside shakshuka, a North African skillet delicacy of eggs with runny yolks suspended in a spicy tomato and bell pepper sauce. With shakshuka perhaps Israel’s most famous culinary export of late, you can even buy a kit to make it at most Trader Joe’s.
 Missed our webinar? Watch the recording here.
“The red version is great, but for me it’s green shakshuka,” said Avivit Priel, chef and owner of Ouzeria, a Mediterranean restaurant in Tel Aviv, referring to versions of shakshuka that typically use wilted greens and herbs as a bed for eggs. “It’s that fusion of traditional with the new, combining local ingredients in a dish that is both cooked but fresh.”
But what if Israel’s defining dish isn’t a dish at all? Hedai Offaim, a farmer, restaurateur and musician who lives in the Judean Hills near Jerusalem, has a different answer altogether.
“It’s less about what’s on the table than about how it is being eaten by the people at the meal,” said Offaim. “The unique thing about our food culture is that people gather in the kitchen to eat a variety of foods from a variety of cultures because they’re looking to each other to help retrieve a joint identity that was lost for 2,000 years.”
In Offaim’s kitchen, manifestations of that identity might include a Mizrahi-influenced lamb shank roasted with whole Medjool dates or a warm Ashkenazi egg and potato salad.
“Today,” he said, “when there seem to be fractures and divisions among parts of society, the one place they all meet is around the table.”
As you celebrate Israel this spring, enjoy my recipes for pita, green shakshuka—an inspired choice for any upcoming dairy Shavuot menu—and chicken schnitzel from my cookbook Sababa: Fresh, Sunny Flavors from My Israeli Kitchen.
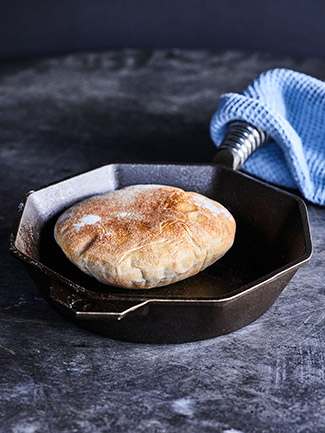
Cast-Iron Skillet Pita
Makes 8 pitas
3 cups all-purpose flour, plus more for shaping
1 cup whole-wheat flour
1 3/4 cups warm water
4 teaspoons instant (rapid-rise) yeast
1 1/2 tablespoons sugar
2 tablespoons olive oil
1 tablespoon fine sea salt
- In the bowl of a stand mixer, use a wooden spoon to mix 1 cup of the all-purpose flour, 1/2 cup of the whole-wheat flour, 1 1/4 cups warm water, the yeast and 1/2 tablespoon of sugar. Let this rest, uncovered, until puffed and foamy, 20 to 25 minutes.
- Add the rest of the all-purpose and whole-wheat flours, the remaining 1/2 cup water, the remaining 1 tablespoon sugar, the olive oil and the salt. Attach the dough hook and bring the dough together over low speed, then raise the speed to medium and knead the dough until slightly springy but still slightly soft and sticky and pulling away from the side of the bowl, 5 to 6 minutes (add flour by the tablespoonful if needed but try not to add too much). Remove the dough hook, cover the dough with a clean kitchen towel and let it rest in a warm place until doubled in size, 45 minutes to 1 hour. Refrigerate the covered bowl for another 45 minutes to 1 hour (this helps develop the flavor and texture of the dough).
- Flour a work surface. Gently transfer the dough to the surface and shape it into a rectangle about 1-inch thick. Use a sharp knife to cut the dough into 8 equal pieces, then form each piece of dough into a ball, tucking the ends underneath and pinching them together gently to help encourage a nice round shape. Cover the dough balls with a clean kitchen towel and let them rise for 30 minutes.
- While the dough is rising, take a clean cast-iron skillet or griddle and scrub off any bits stuck to it (these can burn). Arrange a rack about 8 inches from the broiler, invert the skillet, and place it on the rack. Preheat the oven to the highest it will go (500° or 525°, or even 550°).
- Uncover the dough, gently flour each ball and use a rolling pin to roll the dough into a circle by rolling up and down to form a 6-inch oval. Rotate the oval 90 degrees, then roll the dough again; it should roll into a beautiful 5-inch round. As you roll the dough into rounds, place them on the towel and cover them with another clean towel and let them sit for 10 to 15 minutes, until the pitas have fluffed up to about twice their original height.
- Uncover the dough, open the oven and place one of the rounds flat on the skillet, working quickly and closing the oven so it holds its high temperature. Bake the pita until it’s puffed and golden, 2 to 2 1/2 minutes. Using a spatula, remove the pita from the skillet and repeat with the remaining pitas, letting the oven and skillet preheat for a minute or two between pitas. (If you have a really large skillet or a long cast-iron griddle, you can do two pitas at a time.)
- Let the pitas cool slightly, then ideally eat while still warm. Once cooled, wrap individual pitas tightly in plastic wrap and freeze for up to 3 months. To serve, defrost, then toast in a toaster oven; heat in a 400° oven for 3 to 4 minutes; or warm directly over a flame on your stovetop.
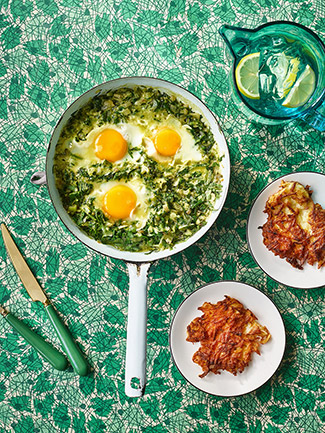
Creamy Green Shakshuka
Serves 4 to 6
1/3 cup extra virgin olive oil
1 large onion, finely diced
3 large garlic cloves, thinly sliced
1 pound (about 16 cups) roughly chopped stemmed mixed green leaves (such as kale, spinach, chard), from 1 1/2 pounds unstemmed mixed greens
1/4 cup vegetable broth
1 cup packed mixed fresh herbs (parsley, cilantro, basil), finely chopped
1 teaspoon chopped fresh thyme, za’atar or oregano
1 tablespoon finely chopped jalapeños
1 teaspoon kosher salt
1/4 teaspoon freshly ground black pepper
1/8 teaspoon freshly grated nutmeg, plus more to taste
1/2 cup half-and-half (or 3/4 cup if you’re feeling the creamed-spinach vibe)
8 large eggs
1. Set a rack in the top third of the oven.
2. In a 12-inch oven-safe skillet, heat the olive oil over medium heat. Add the onions and cook, stirring, until lightly golden, 9 to 10 minutes. Add the garlic and cook, stirring 1 more minute. Raise the heat to medium-high, then add the greens in batches, stirring as they wilt and release most of their liquid, 2 to 3 minutes per batch (you don’t want the greens to be completely dead, but they should have slumped and reduced in size significantly). Add the vegetable broth and cook until mostly absorbed. Stir in the mixed herbs, thyme, jalapeño, salt, pepper and nutmeg.
3. Preheat the broiler.
4. Reduce the heat on the stove to medium-low, stir in the half-and-half, and simmer until the mixture unifies and thickens slightly, 1 to 2 minutes. Use a spoon to hollow out eight small wells for the eggs and crack the eggs into the wells. Cook for 3 minutes, then transfer to the oven and cook until the whites are just opaque, but the yolks are still runny, 2 to 3 minutes.
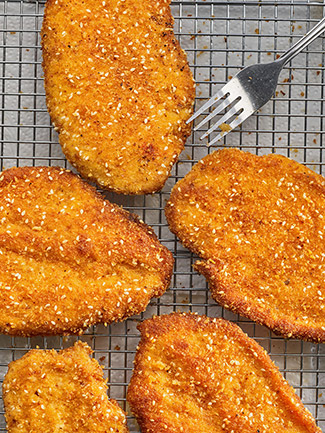
Crispy Sesame Schnitzel
Serves 4
1 cup dried breadcrumbs
1/2 cup panko breadcrumbs
1/4 cup sesame seeds
1/2 teaspoon paprika
1/2 teaspoon garlic powder
1/2 teaspoon freshly ground black pepper, plus more for seasoning
1 teaspoon fine sea salt, plus more for seasoning
1/4 teaspoon cayenne pepper, or more if you like it hot
2 large eggs, beaten
1/2 cup all-purpose flour
4 6-ounce boneless, skinless chicken breast halves
1/2 cup vegetable oil, for frying, plus more as needed
1. In a shallow dish, combine the dried breadcrumbs, panko, sesame seeds, paprika, garlic powder, 1/4 teaspoon of the black pepper, 1/2 teaspoon of the salt and the cayenne. Place the beaten eggs in another shallow dish.
2. In a third shallow dish, combine the flour with the remaining 1/2 teaspoon salt and 1/4 teaspoon black pepper.
3. Season the chicken generously with salt and black pepper. Place each piece between 2 pieces of plastic wrap and pound lightly with a mallet to achieve a thickness anywhere between 1/8 and 1/4 inch. If you prefer your schnitzels to be smaller, this is the time to halve them.
4. Line a sheet tray with parchment. Dredge the cutlets in the flour, then the egg, then the breadcrumb mixture, shaking off the excess after each step and pressing the crumbs in firmly on both sides. Arrange them on the sheet tray as you finish the breading process. If desired, wait 30 minutes before frying (this helps the crumbs adhere better).
5. In a heavy skillet, heat the vegetable oil over medium heat for 2 to 3 minutes; the oil should be hot but not smoking. Working in batches, lay 2 cutlets in the pan and fry until the underside is golden brown and crisp, 2 to 3 minutes. Flip and fry for 2 to 3 more minutes. Drain on paper towels, season with salt and pepper to taste, and serve hot.
All recipes from ‘Sababa: Fresh, Sunny Flavors from My Israeli Kitchen’ by Adeena Sussman
Adeena Sussman is the author of Sababa: Fresh, Sunny Flavors from My Israeli Kitchen and the upcoming Shabbat: Recipes and Rituals from My Kitchen to Yours, set to be released on September 5. She lives in Tel Aviv.

 Facebook
 Instagram
 Twitter
eileen says
Thank You for the recipes
I make my Crispy Sesame Schnitzel in the oven and the kids seem to like it
Of course it isn’t as good as the fried . My question is
How do you keep this warm while you are preparing the rest of the meals
This holiday I am making several other dishes so would I make the schnitzel ahead of time and then re warm ? My oven and stove will be busy with other dishes
How would I re warm the schnitzel so its not dried out
I appreciate your guidance Sweet Year to you Shana Tova